Techniques
Your selection of quality ingredients will always play a large part in determining a recipe's successful outcome. After that, your success is often dependent upon the mastery of technique. When you start with flavorful fresh products at their peak of flavor, techniques that apply less heat, less cooking time and less handling will net the best results. Technique can drive flavor enhancement, color development, texture transformation and nutrient preservation. This section is a reference for detailed techniques that are not described in as much detail in the individual recipes on this site.
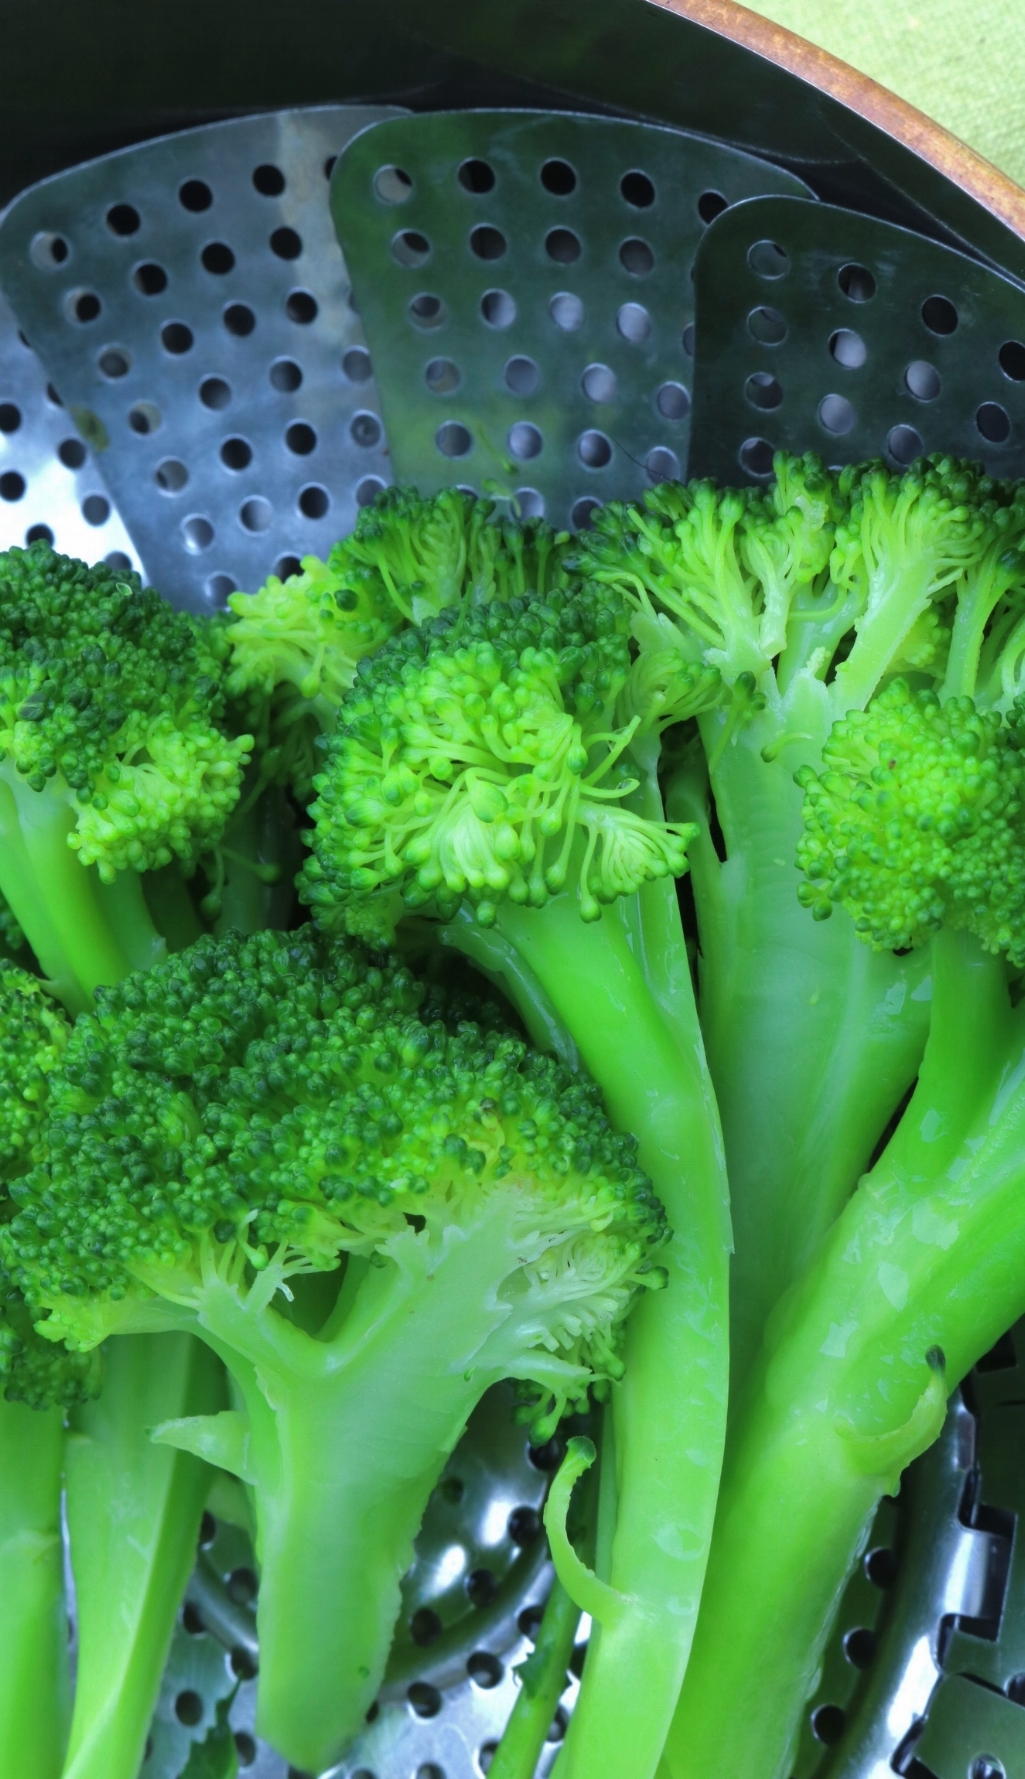
blanching

Blanching is a cooking technique that involves plunging the ingredient (usually a vegetable or fruit) into boiling water for a short time and then submerging it into an ice bath to arrest the cooking process. This technique is used when you want your vegetables cooked to a precise stage (such as squeaky haricots vests) or need to remove the skins from your tomatoes, peaches or nuts.
Bring water to a boiling point. The ingredients should have ample room to roll around in the water.
If you are blanching solely to remove the skins, simply plunge the ingredient quickly in the water for 1 minute, scoop it out with a slotted spoon, and place it on a clean dishtowel.
If you are blanching to cook the ingredient, salt the water sufficiently so that you can taste the salt in the water. Add the ingredient to the boiling water and cook just long enough to soften the cell walls (typically 1-3 minutes). The chlorophyll in a green vegetable will transform to a bright green, the carotene coloring in a yellow or orange vegetable will brighten. Strain the ingredient (discarding the hot water) and plunge it immediately into a bowl of ice water to halt the cooking process.
Boiling
Boiling water is hardly a technique that needs explaining. It is one of the first techniques we learn in the kitchen and one of the easiest. The only problem with boiling is overcooking the ingredient.
Boiling is a cooking technique for many ingredients, including grains and pasta (fresh pasta does not take as long to cook as dried pasta). It is also a good technique for starchy tubers and root vegetables such potatoes, yucca, yams, beets, rutabaga, parsnips, celery root and turnips, all of which can be boiled in salted water until soft.
Boiling happens at different temperatures, depending on altitude. Water boils at sea level at a temperature of 212F*. Water meets less atmospheric pressure at higher elevations, where it boils at a lower temperature.
Cleaning Dungeness Crab
It's difficult to describe the process of cleaning crabs in writing, and so I'm pleased to introduce my first video, in which I show you how it's done!

Grilling
One of my favorite ways to prepare dinner is to grill the food over a wood or mesquite charcoal fire.
Grilling is a form of cooking that involves dry heat. The high temperature of wood and charcoal (600*F - 750*F) evaporates water content very quickly, causing the food to caramelize, develop a crispy texture, and take on a smoky flavor.
Whether you grill on a gas grill or over a fire, the process is the same: be sure to start with clean grill grates (no need to revisit your last meal on the grill). Lightly brush the cooking surface with oil so the food won't stick. Heat the grate completely before putting any food on it.
If you are building a fire, start early and allow the flame to burn down to coals that radiate deep heat. This could take up to 2 hours. Keep in mind that as you cook, your coals will continue to change temperature. Grilling over coals requires a bit of adaption!
If you are using a gas grill, the warming rack above the grill grates is an excellent place for salmon filets, whole fish, split bone in chickens, lamb legs in tied muscle groups or any other ingredient that does not need direct contact with a hot grill. This section of the gas grill creates a natural heat convection area when the grill cover is down, allowing food to brown evenly with requiring rotation.
Lightly oil and season your ingredients before placing them on the grill. As the food begins to brown, rotate the items with a pair of tongs to help them cook and color evenly. Perfectly cross-hatch grill marks are a nice touch to a cut of meat, but certainly not essential. Food on the grill can dry out or burn quickly, so always monitor anything on direct high heat.
If your fire or charcoal grill is large enough, you can create different heat zones to allow for the rotation of foods from high to medium to low heat. This can be done by moving the coals around into piles after they have burned down.
Pan Roasting
The terms "pan roasted," "pan seared" or "pan fried" usually apply to cuts of meat, fish or poultry that are browned in fat in a pan. The protein is generally not stirred or moved about (as you would with a sauté). Pan roasting is focused on cooking and coloring on the stove top, although if the ingredient is thick or dense in texture it might be finished in a moderately heated oven at 350*F.
If the ingredient has been marinated, attempt to dry the item well before cooking. If the protein has not been marinated, dry it well and season it with salt before cooking. I usually do not add ground black pepper until after the item has been cooked. That said, in the case of a recipe for a pepper-crusted protein, pepper away before pan roasting!
Brown the ingredient in hot fat on the stove top in a pan. If necessary, transfer the item to the oven for further cooking and coloring in accordance with the desired temperature. Basic temperature guidelines for cooking meats, poultry and fish are as follows: 125*F = rare; 130*F = medium rare; 150*F = medium well; and 160*F and above = well done.
Poaching

Poaching is simply cooking by simmering a protein (often a fish) in a liquid that is infused with other ingredients to add flavor, aroma and depth ("aromatics"). This technique is used for a protein that has a strong oil or fat content. Since there is no added fat, poaching is considered a healthy option for cooking proteins.
The poaching liquid can consist of water, wine, herbs, spices, and vegetables such as carrot, leek or onion. Some cooks also add more pungent flavors such as fresh ginger, garlic or lemongrass.
Bring liquid and aromatics to a simmer (190*f), allowing the aromatics to bloom. Season the protein and place it gently into the poaching liquid. Cook through to the desired temperature and then remove the protein, letting it air dry for a moment before serving.
Sautéing
Sautéing is frying an ingredient quickly in a little hot fat.
This cooking technique is best done with a heavy bottomed pan. Heat conductivity varies depending on the metal. Cast iron, stainless steel and copper pans all conduct heat well.
You need to heat up the fat in the pan but you don't want it so hot that it starts to smoke. Animal fats such as butter, chicken, duck or pork fat have lower smoke points then plant-based fats. Animal fats will begin to break down and smoke between 300*f and 350*f. Olive oils also break down and smoke early, but some can reach 400*F. Peanut oil smokes at a higher temperature (up to 440*F) and if you want excessively hot oil, soybean and rice bran oil can rise to 450*F and above. I recommend keeping a soy, coconut, grapeseed or rice bran oil in the kitchen, just for high temperature cooking (I reach for grapeseed). Healthy choices are also a consideration when choosing an oil; I recommend a plant-based oil for this purpose.
One important aspect of learning this technique is to cut up your ingredient into uniform small pieces so they all need to cop the same length of time, no more and no less. If you are sautéing more than one vegetable together, a pre-blanched ingredient may be used in addition to the raw ingredients to cut down on the sautéing time and have all the vegetables cook the same length of time.
Once the fat is heated in the pan to a high temperature, just below smoke point, add the seasoned ingredients and begin to cook, making sure the food does not stick to the pan by moving it around in the pan. This technique requires a sensory approach to cooking: watch the transformation of the ingredient(s) until your sauté is browned but not overcooked.
Steaming
Steaming is an alternative to blanching that does not submerge the ingredient in water. Steaming is a technique popular for vegetables and is a final technique, meaning you serve the vegetables immediately upon removing them from the pot.
Steam is created when water goes above the standard boiling temperature of 212*F. The steam needs to rise past the ingredient to cook it. One method is to use a thin woven wood or bamboo basket, usually affiliated with Asian cuisines, placed over boiling water in a wok or large pan. This method captures the steam within the stacked and sealed basket layers. Another common option is a stainless steel vegetable steamer placed in a pot over a small amount of boiling water.
Regardless of your method, keep an eye on your vegetables. They will be cooked in no time flat (usually 1-3 minutes).
Washing lettuce

I know some of you may wonder why washing lettuce is a "technique" worth describing. I met my wife when she found a caterpillar -- actually, half a caterpillar -- in her salad at my restaurant. She has never let me live this down. So let me tell you how I [now] clean lettuce.
Start with the best lettuce you can find. It can be one variety or a mix of lettuces (often called "Mesclun"), a mature head or baby lettuces, whatever is the freshest and tastes the best to you.
Fill a bowl or sink with water. I don't like to run the water over the delicate lettuce, as it can bruise the tender leaves. Gently submerge the lettuce into the water, making sure there is a least a ratio of 3 parts cold water to 1 part lettuce. The more water in the bowl, the more likely any debris will come loose and fall to the bottom of the water. This process may need to happen two or three times with winter lettuce that has been subjected to rainy weather (read: muddy soil).
Spin the lettuce dry in a salad spinner, removing the water at the bottom of the spinner between spins.
Chill the clean lettuce for at least 30 minutes before tossing your salad. This will bring a crisp crunch to the leaves.
Toss the lettuce gently with vinaigrette just before serving. Use a modest amount of dressing; you can always add more but you can't take it away if you add too much. If you are adding any fruits or vegetables to the lettuce, these should also be tossed in the vinaigrette. Quality cheeses and crunchy items such as nuts and croutons should be added dry to the top of the dressed salad.
VINAIGRETTE
In many grocery stores, bottled salad dressings take up the most shelf space after salsa. In the time it takes to browse the numerous choices, you can make your own dressing; it takes less than two minutes!
Many variations can be made when beginning with a basic vinaigrette recipe. That said, if you find a favorite, there’s no reason you shouldn’t stick with it; use the dressing you and your family love. After all, not every salad needs a customized dressing.
Mustard, oil and vinegar are the foundation of most vinaigrettes. Which variety of each of those ingredients you use is up to you. You can use a whisk to blend the ingredients by hand, or emulsify them with a blender, food processor or immersion blender. Again, the choice is yours. The only real key to making a good dressing is finding the proper ratio of acid (usually vinegar or citrus juice) to oil. The other ingredients--shallots, garlic, herbs, spices, dried fruit--should take a backseat to the oil and vinegar, offering complementary flavor and texture to the vinaigrette without dominating.
Knife skills

What a personal topic! I was never taught how to hold a knife and while teaching culinary school, there was never one way to teach a student how to hold a knife, as each human hand is different. The best rule to follow would include a firm grip using hand and arm strength, allowing the cook to be in control of the cutting action. What gravitates one cook to "hike up" on the handle of the knife, meaning fingers closer to the blade, versus keeping the grip on the lower edge of the handle pertains to the hand being in control and comfortable.
The five dominant types of knives are the French knife, the paring knife, the boning knife, a thin filet or slicing knife and a serrated edged knife for bread slicing. These five knife types fill ninety eight percent of the time my hands have spent with a knife. Not to say that collecting a caché of various knives, is not a worthy pursuit over time.
A sharp knife is critical and then every other stroke, chop, cut, slice, dice is really a matter of practice and gaining confidence with prescribed knife cuts. Trained chefs make using a knife look easy and with thousands of hours of practice, this is what transforms an irregular cut into a precise cut.
Kitchen machinery has replaced the larger tasks of reducing whole product down to a size that can be eaten with a spoon or fork. For the majority of home cooked meals, using a knife is part of the contribution to the meal. It creates the unique look of each plate and makes eating the the meal the easy part.
Other preparation techniques
In a professional kitchen, the prep cooks work are culinary tasks that are the back bone of a good scratch kitchen. The tasks are repeated many times over the course of various meals. This section, like the technique section above, is intended to offer more details into kitchen work that contributes to creating flavorful outcomes when preparing recipes.

CLEANING ARTICHOKES
When I clean artichokes I keep lots of lemon on hand. I use a stainless steel or enamel pot to cook the artichokes in. Aluminum will cause the artichokes to darken. A metallic reaction to the vegetable changes the coloring once it is exposed to oxygen. The citric acid from the lemon slows this process by coating the artichoke and preventing immediate dis-coloring.
Bring the poaching liquid to a boil before you begin cleaning the artichokes. The water should have ample salt. Sliced onion, garlic, herb stems, cracked black pepper and a little white wine can be added to enhance the flavor composite if desired.

Using a sharp stainless steel knife, remove the tops of all of the artichoke 1 inch below the top. After the tops are removed, peel off the outer layer of leaves, getting to the tender inner leaves that will be lighter in color, possibly turning to more of a yellow color tone. Rub the artichoke with fresh cut lemon. If the artichoke has a stem, use a pairing knife to remove the tough end of the artichoke. Then holding the artichoke up, with the top pointed down, begin to trim the outer layer with the paring knife, slowing trimming down and cleaning the bottom of the artichoke of its outer layer. Rub the cut areas of the artichoke with lemon. Repeat with each artichoke.

Once the artichokes are all cleaned, cut them in half, drop them into the poaching liquid and simmer at a low temperature. You can place a piece of food friendly baking paper onto the submerged artichokes and then place a weight, such as a plate, on top of them to make sure the artichokes are submerged in the cooking liquid until done. Depending on the artichoke size, 15 minutes for baby artichokes or 20-25 for mid sized artichokes. The artichokes can be slightly under cooked and cooled in the poaching liquid to absorb the poaching liquids aromatics and flavor. Slip a knife tip through the artichoke bottom to test for doneness. If the knife passes through with ease and no resistance, the artichoke is done. If straining the artichokes do so then place on a plate and cool in the refrigerator.
MAYONNAISE
1 egg yolk
1 teaspoon Dijon mustard
Juice of half a lemon
1 cup olive oil, or light, neutral oil such as grapeseed
1 teaspoon white wine vinegar
Salt and cayenne pepper to taste
If a fellow kitchen helper is handy, ask her to assist either by holding the bowl steady while you whisk, or by slowly adding the oil while another hand whisks briskly. The transformation of ingredients is fascinating to watch if you have the easy job!
Combine the yolk, mustard and lemon juice in a bowl and whisk together 15 seconds or so. Slowly (this is both the key and the trick!) begin to drizzle in the oil, keeping the stream slow and steady until an emulsification is established. You'll know by watching the side of the bowl, where you'll see “ribbons” collecting consistently on the edge. If the ribbon is fragmented or broken, or looks more like oil than a smooth, uniform mixture, add the oil more slowly. Once the mayonnaise appears to have stabilized, you can begin to add the oil more quickly again, until the entire amount has been incorporated.
Add the vinegar, salt and pinch of cayenne pepper. Adjust the seasoning, adding more lemon juice for acidity if desired. Store the mayonnaise in the refrigerator until ready to serve.
There are endless variations on this cold sauce, the most popular being aioli, which included the addition of a clove of garlic, finely minced or grated on a microplane. Finely minced herbs are another excellent addition.

SHUCKING OYSTERS

This task is best when shown to a first time shucker but if taken slowly and with caution success can happen on the first attempt. The bivalves are tricky to navigate and locating the best spot to insert the shucking knife into the oysters curved hinge is the key to getting started.


The tool of choice is an oyster shucking knife. There are various types. The sides of the shucking knife are never sharp but the tip should be. The wood handled is wide and round at the end, so that it can stabilize in the palm of your hand as you apply some pressure to the oyster shell. Another variety of shucking knives is stainless steel and the blade and tip is wider. The wider tip is to grip more shell space when the proper hinge is located. Creating more of a rocking motion to open the shell, as opposed to the sharp, pop! that is heard when the shell releases from the thinner tip. The wide edged variation relies more on working the tip, so the handle is straight and does not rely on the palm of the hand as much, to create the rocking motion.
Rinse the oysters first. Removing any excess shell or marine debris. Have a towel in one hand for securing the oyster flat on a surface. Using your preferred hand with the shucking knife in it, find the hinge on the flat side of the shell, where the tip of the oyster appears, not the rounded edge. Place the tip of the knife into the hinge and find a location where the top and bottom connect and the knife tip can insert to gain leverage. Using more wrist work then arm strength, begin to wiggle the tip back and forth, looking for the shell to separate. Continue with palm pressure and wrist rotation and pop the shell open carefully. The knife should remain in the shell as it is pressed flat upward to separate the oyster from the shell without tearing it. Once the shell is removed, tuck the knife under the oyster to remove it from the foot, or muscle tissue that connects the oyster on the curved side of the shell. Place the raw oyster on crushed ice and serve with lemon, black pepper or the mignonette sauce in the recipe section.
roasting pepppers

Roasting peppers is a technique used to de-skin the pepper, soften and intensify the sweetnesss of the pepper. This task is best done over open flame. Either a live fire or gas burner. I place a wire rack directly over the high flame and place the pepper directly onto the rack, over the flame. Roasting the pepper on all sides, until the pepper has been completely charred and the flesh wall collapsed.
Attempting to not exposed the pepper to water while peeling off the charred skin, I put the pepper(s) in a bowl and lightly salt them. Cover the bowl with plastic wrap to utilize the steam coming off the roasted pepper as a moisture source to assist with steaming off the charred skin. It is easier to peel the pepper after this application. Discard the stem and seeds. If the pepper needs a quick water rinse, it would not completely dilute the concentrated pepper flavor. The roasted pepper is now ready to be used in a salad, pureé or marinated for use on a antipasto platter.
PIZZA DOUGH
MAKES EIGHT 12 INCH PIZZAS. USE AN ELECTRIC MIXER WITH A DOUGH HOOK FOR THE 20 MINUTES PLUS OF KNEADING TIME. OVEN TEMPERATURE FOR THE FINAL BAKE SHOULD BE AS HIGH AS a conventional gas or electric OVEN WILL ALLOW. 500*F-550*F

I have experimented with pizza doughs for years, never running a pizzeria, but Wildwood restaurant had a wood fired oven for pizzas and a tandoori oven for naan breads. I have found that using double zero flour for the dough is best and an overnight rising time benefits the final dough, fermentation, workability and final crust quality. Double Zero is a fine soft flour that is slightly lower in gluten, used predominately for pastas and pizza doughs. It is more expensive then all purpose flour. Make a decision about which type you like, knowing that either type of flour will work.
INGREDIENTS
3/4 teaspoon active dry yeast.
3 cups warm water. 100-105*f
1 tablespoon olive oil
1 tablespoon salt
8 1/2 cups double zero or all purpose flour
Mix the water with the yeast in the mixing bowl. Watch for the yeast to foam. Because this dough is worked in the mixer so long and it requires and overnight rise, I have found the yeast activates eventually, unless it is yeast that has been at room temperature for over six months. If that is the case, discard the yeast and purchase fresh in bulk and keep it in a freezer for best results.
Add the flour, salt and olive oil and begin to mix on low speed for 8-10 minutes or until the dough releases from the sides of the mixer and becomes one large ball. Turn the mixer off and allow the dough to rest for 6-8 minutes. Turn the mixer back to low speed and continue to knead for 8-10 more minutes, or until the dough becomes soft, elastic and smooth to the touch. Remove the dough and place into a clean bowl with a little olive oil to prevent the dough from sticking. Cover with a towel or plastic wrap and refrigerate overnight.
Remove the dough the following day. Knead the dough back down to size and then cut into 8 even pieces, weighing 4-5 ounces each. Roll each individual dough, using the palm of your hand to tuck and roll as you make small circles with your hand. Place the individual doughs on a oiled surface and re-refrigerate for 2-4 hours.
The dough can be used at this point if needed. Allow the dough to come to room temperature and then roll into a desired shape on a flat surface, applying more flour to prevent the dough from sticking to a surface. The dough is very elastic and can handle a thin forming and rolling before toppings are placed on top. Apply the desired topping while the rolled dough is resting on a pizza peel and has ample flour or cornmeal under it for quick release when put into the oven.
Slide the prepared dough into the oven and close oven door. Rotate the pizza one time while cooking if possible. Remove with the peel when the desired crust color is achieved. Baste the side crust of the pizza with a little olive oil and lightly salt the pizza before slicing in desired sizes and serve